#CSS Tutorial with Examples
Explore tagged Tumblr posts
Visit Tumblr Blog
Explore Tumblr blogs with no restrictions, modern design and the best experience.
Last Seen Tumblr Blogs


Fun Fact
The “We are the 99%” Tumblr blog became the slogan for the Occupy Wall Street movement.
Text

CSS Slideshow with Thumbnails
#html css slideshow#css slideshow#css slider#css slider with thu#css slider with thumbnail#html css#codenewbies#frontenddevelopment#html5 css3#css#css animation examples#css animation tutorial#pure css animation#code#webdesign
5 notes
·
View notes
Text

CSS Animated Text Overlay
#css animated text overlay#css animation examples#html css animation#css animation tutorial#html css#codingflicks#frontend#css#html#css3#frontenddevelopment#learn to code#webdesign#animation#css image hover effects
11 notes
·
View notes
Text

3D Cube Animation
#3d cube animation#html css animation#html css#divinector#frontenddevelopment#css3#css animation tutorial#css animation examples#css animation snippets#css#html#learn to code#code
6 notes
·
View notes
Text
felt like i was going crazy yesterday trying to set up a login system for this website 😭 it was like i was back in college again!
#im using supabase for auth and i was like someone pls...show me how to do this...with just vanilla js#every tutorial is with like react or next#im trying to do this site with just html css and js (and php)#so i can learn#and later if i wanna move things to a framework i wont be completely lost if something breaks!#but yea i pretty much settled on like using react for part of the website so i can get this login set up#i found some videos and articles so im pretty sure its possible#other options is to use the archived js example i finally found for supabase auth but#it scares me that its archived#fingers crossed next time i code this works#i think this has to be the hardest part of the coding#i wish i could do my own auth thing but thats super dangerous as a beginner#anyways if i get stuck again ill just try the archived js example#and if im still stuck...#idk find another auth thing to use ig#BF RALLY WILL HAPPEN IT WILL#if it doesnt it means i died or someshit lol#but yea im mainly just like ugh about react cause i seriously dont need all those libraries added rn#this sites not supposed to be that complicated imo like yea its dynamic but its like a neopets like thing#the partial react thing doesnt rely on installing a bunch of stuff (i think)#so maybe we r good#????#web development#webdev#coding#codebreakers#if someone has the magic video to hand hold me through these pls send lol
2 notes
·
View notes
Text
youtube
Fancy css button animations
2 notes
·
View notes
Note
Hello! Your IF story inspired me to start my own IF game
Im thinking of using twine
And I would like to ask you if you had any tips or advice
Thank you!
Also side note I’m really excited and very interested in how this story is going to play out I already love the cast and can’t wait to see the rest!
OOoo thank you so much! I'm very flattered the game inspired you!
Twine has many different story formats, each with their own pros and cons. I personally use Sugarcube (I think next to Harlow, it is the most popular) so all my tips will be for Twine Sugarcube:
Basic tips:
Bookmark the Sugarcube V2 Document. This is your bible. It will have everything you need to use Twine. It's a daunting read, but I use it to troubleshoot when I forget how Macros work. I always have tab open for it.
Download a Twine Template. If you are brand new to Twine and making IFs, I heavily suggest downloading a template or two. Most of them come with tutorials and examples on how they work. Sometimes they even provide more helpful resources on Twine. I use Vahnya's Template II that I modified myself afterwards.
Study from pre-exisiting Twine IFs. Might be controversial, but I personally believe that diving in and seeing how other authors code and structure their stories helps a lot. Eventually you'll figure out a system and structure that works for you. It might not work for all games, but most Twine games can be downloaded and opened up in the twine editior. If you're worried about spoilers or upsetting people, feel free to download my game and see whats inside. I make multiple copies of the game, so any build I have out in the public is not the original build and therefore have no spoilers. I know it will look insane when you open it, but there's a method to the madness.
Writing and Planning:
Making an IF is no joke! Plan your story out, know your big variables, your branching routes and at least some part of your ending!! Try to stay as organized as possible. These projects and can will spiral out of control if you're not careful. I suggest having a giant excel sheet with tabs for important variables, chapter/scene breakdowns, wordcount and characters ect. Updating it will be a pain (that I am guilty of not doing) but will make developing easier. Even if you don't make a big project, its still good practise to do it.
#Stylesheet:
All the code in here relates to how the game looks. You can fiddle in there to configure the game to look how you want it to look. If you even want to see what element is tied to what ID code, the best thing to do is playtest the game (build >> play) and then leftclick and select "inspect element" you browser will open up the developer window and you see what elements are tied to what and even play around with the contents to test out CSS elements you like.
This website is a great resource on using CSS and other coding language. I personally used it many time to modify my game.
Helpful resources and Macros:
Chapel has made a LOT of custom macros that you can add to your game. You can find the list here.
But the most important one is the Pronoun Template. It might be confusing at first but one you understand how it work, its a great tool to have. You can even add gendered titles so that they work with the pronoun template.
Idrellegame is a great resource on coding in Twine. You can find the list here. It helped me out when starting out.
Exporting to Itch:
I never see people talk about Butler when it comes to uploading If games onto itch.io, so i'm doing it now.
What is Butler? Its a command-line tool that Itch made to upload your game onto Itch.io quickly and reliably.
The documentation is here. And I suggest coping and pasting the export codes onto a doc so you can use them for every update afterwards.
Here is a youtube tutorial you can follow along as well: https://www.youtube.com/watch?v=_JCJa5iWREM
I personally have the Butler on the Itchio.app so that's its always up to date.
Thats all I can offer off the top of my head, if you or anyone wants some help on something specifically, feel free to DM me or drop another ask in the inbox. Always happy to help. Working in twine is very overwhelming for newcomers.
60 notes
·
View notes
Text
How I added "instant translation" to the non-english text on my fic: a very easy 3 step guide
Hello!
I recently posted a Wolfstar fanfic called Instance of Happenstance and received a lot of compliments on a small piece of code I used. Both @marigold-hills and @leavesthatarebrown suggested I share how I did it, so here I am, finally explaining it in a Tumblr post!
Before diving into the details, I want to clarify that I didn't write this code myself.
Initially, I tried following this tutorial, but I stumbled upon a better solution in the comments of that post. The code on the tutorial itself does work, but a) it's harder to use and b) it doesn't work as well if you're planing to have multiple paragraphs that you need to show the translation on the same fic.
The solution someone presented on the comments, however, is very simple and easy to use for as many paragraphs as you need, but the explanation there wasn’t too clear, so I decided to expand on it to make it easier for others to implement.
All credit to Ao3 users La_Temperaza (who wrote the orginal post) and Nikkie2571 (who posted this code on the comments).
What Does This Code Do?
This code adds an interactive feature to your fanfic, allowing readers to hover over a specific paragraph (or tap on it if they’re on mobile) to instantly change the text to something else — also set by you.
While this can be used for various purposes, I think it's particularly useful to display instant translations of non-English dialogue/text directly in the story. The code offers a much smoother alternative to the clunky “see end notes for translation” thing—which, let's be honest, can be a pain for readers, especially in long chapters.
For example, in instance of happenstance, Sirius discovers an old journal written entirely in French. I wanted to maintain the sense of mystery and intrigue that would be lost if I simply said the journal was in French, but wrote the text in English.
This solution let me keep the best of both worlds—retaining the authenticity and the immersion of the French, while still making the story easy to follow for the readers.
Now, I know this sounds complicated, but I assure you, it's not!
Down bellow is a quick, 3 steps tutorial on how to do it. I hope this is helpful! (:
(I'm doing this on the computer, if you're doing it on mobile, the layout of the website might be different from my printscreens)
Step 1 - Create The Work Skin
I'm gonna go right to the point here, but if you want to know about Work Skins in detail, I suggest this Ao3 Article.
On your Ao3 Dashboard, click on the fourth link on the sidebar, which is "Skins".
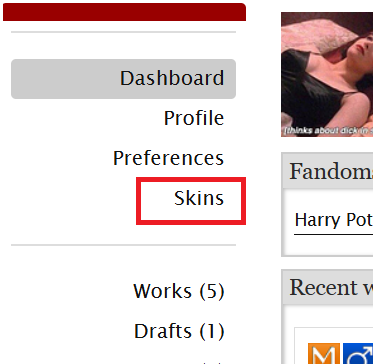
Then, on the page that opens up, click on "My Work Skins"

Then, on the top of the page, select "Create Work Skin"
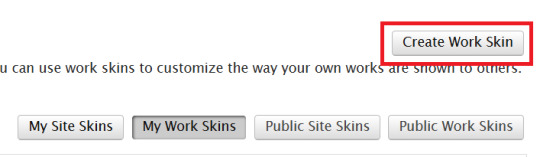
Now, you'll see the form to create your skin, which looks like this:
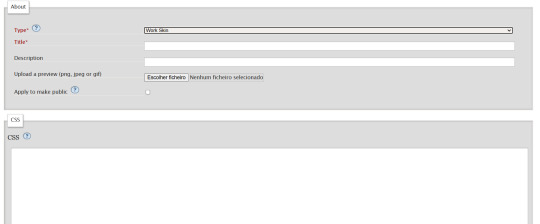
Leave the "Type" as "Work Skin". On the Title, you can give any name you want to your skin, but I suggest you choose the same title as your fic or something like "instant translation", so you'll know what it's about later.
You don't have to worry about any of the other fields, except for the CSS one, where you should copy and paste exactly what I'll put bellow:
#workskin .change_on_hover:not(:hover) .on, #workskin .change_on_hover:hover .off { display: none; }
So, now, you'll have something like this...
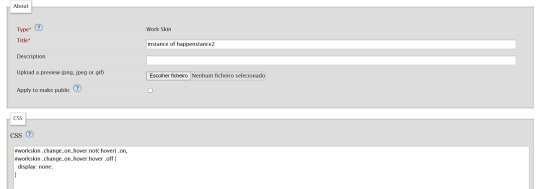
... and you just have to click "save" on the bottom of the page, and this step is done.
Step 2 - Apply the Skin you created to your fic
For a new work, click on "New Work" as usual. If it's a fic you're already posting, you can add this as well, just click the "Edit" button.
Now, on the form of your fic, on the "Associations" tab, right under the menu where you select the language of your fic, you'll see a "select a work skin" option.
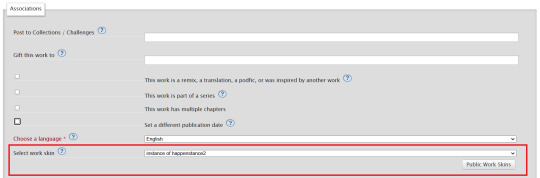
On this field, you should select the workskin you just created on the previous step, searching by the name you gave it on the "Title" field.
Step 3 - Insert the text
The code we're gonna use is this one:
<p class="change_on_hover"> <span class="off"> paragraph in foreing language </span> <span class="on"> paragraph in english </span> </p>
If you have no idea what this means, hold my hand, we're gonna get through it together!
First, copy your fic’s text into the AO3 text box as you normally would. Then, switch the text box to HTML mode so you can see the underlying code.

Now, scroll down until you find the paragraph you want to translate. After pasting, it will likely look something like this:

Note how each paragraph in HTML starts with <p> and ends with </p>. These tags indicate where a paragraph begins and ends.
Our goal is to modify that first <p> tag so it tells the browser, “Hey, this paragraph is different from those other ones. It should change when hovered over or clicked.”
To do this, we’ll change <p> to <p class="change_on_hover">. This marks the paragraph as special—one that should switch text when interacted with.

Now note how instead of having a single paragraph, we need two versions of the text:
In blue, the original (non-English) text, which will be shown by default.
In red, the translated (English) text, which will appear when the reader hovers over or clicks on it.
For the original text, wrap it inside a <span class="off"> tag, ending with </span> like this:
<span class="off"> insert here the whole text of the paragraph in the foreign language </span>
For the translated text, wrap it inside a <span class="on"> tag, also ending with </span>. This will replace the original text when hovered over or clicked:
<span class="off"> insert here the whole text of the paragraph in english </span>
And don't forget to end the whole thing again with </p>
Again, here's how it looks on my fic:

With the paragraphs that come before and after the translated text, just leave them as they are. They should still start with <p> and end with </p>. No changes needed!
You can use this method for as many paragraphs as you want, whether in the same chapter or across different chapters. As long as the Work Skin is active, the effect will work seamlessly throughout your fic.
#fanfiction#ao3#ao3 work skins#work skins#translation on text#ao3 fanfic#ao3 coding#tutorial#step by step#fanfic#wolfstar#marauders
80 notes
·
View notes
Text
YOU MUST MAKE A WEBSITE
Oh wow, look at that! YET ANOTHER post urging you to make a webbed site! What a completely new thing that people haven't made a thousand masterposts for already!!
• Making a website might look scary. It is Not.
At first, I too thought making a website was too much work. It really isn't! It turns out that all you need is
an HTML file,
a web hosting service and
w3schools tutorials,
and that's about it!
This post will point you towards these resources, and others I found useful while figuring out how to make a website.
• VERY QUICK EXPLANATIONS:
What's HTML and CSS?
HTML is the content of your webpage, the skeleton of it. What shows up in a webpage is what's written in the HTML file!
CSS is the way the HTML is styled; the colour of the background and the letters, the size of elements, the font, all that!
Do I absolutely NEED JavaScript for a website?
Not at all! You don't need to worry about learning it before getting started.
• What do I make a website for? What do I put in there?
ANYTHING AND ALMOST EVERYTHING. Here's some ideas for pages from a post of mine were I was very normal about websites:
You can make a page that's only pictures of your pets.
You can make an interactive adventure.
You can make your own academic blog full of your own essays or articles.
You can just post a ton of art or make a full music page.
You can make a blog and infodump eternally, give book reccs and reviews. You can host a thousand virtual pets and nothing else.
Upload entire books in a single html file. Make a wikipedia for your ocs. Make a fake site for a random fictional place (restaurant, hotel, whatever). You can make a thousand fanpages/shrines about your favorite media. You can upload your own webcomic and make it all like a fancy website and shit.
I could keep going but, for the sake of "brevity", I won't.
• WEBSITE EXAMPLES!
If I started listing the websites I know, this post would be bottomless. Here's only seven:
https://publictransit.neocities.org/ - A webbed site, for sure
https://ribo.zone/ - A personal site
https://leusyth.neocities.org/ - An art archive
https://solaria.neocities.org/ - Personal website with A Lot of stuff (it'll come up in a bit, because it offers web making resources)
https://hog.neocities.org/ - The Hogsite
https://thegardenofmadeline.neocities.org/ - Another personal site! It also has a web resources page and has made another masterpost like this one (but better)
https://spiders.neocities.org/ - My own website, which must be weird to see in mobile . sorry
• You've convinced me. I want a webbed site. Where do I start?
https://neocities.org/
FIRST OF ALL: Neocities. It is a free web hosting service, and it's the one I and the sites I linked use!
When I first started, my website was a black page with red letters and a drawing, and nothing else! It was like that for a month, till i started picking up on how to do things.
Here's what helped me get an idea of how to make things work:
https://sadgrl.online/learn/articles/beginners-guide-neocities
An absolute beginners guide to neocities -- while when you make an account there you get a tutorial page from the site, this one's extra support for that.
https://www.w3schools.com/
Learn HTML, CSS, JavaScript and MANY other coding things for free. All the tutorial/reference pages have live testing windows for you to mess with!! helped me a LOT while figuring this stuff out!
https://htmlcheatsheet.com/
https://htmlcheatsheet.com/css/
Cheatsheets for HTML and CSS, respectively. It includes a JavaScript one too!
https://sadgrl.online/webmastery/
Sadgrl's webmastery resources! Also includes the next resource listed here:
https://sadgrl.online/projects/layout-builder/
Sadgrl's layout builder; not a lot of customization at a first glance, but I've seen wildly different websites all using it as a base, plus it works using CSS Flexbox, so it generates a responsive layout!
(basically, a responsive layout is one that translates well in different sized screens)
https://www.tumblr.com/fysa/728086939730919424/wikitable-code?source=share
Tumblr user fysa made this layout imitating a wiki page!
https://brackets.io/
At some point, you might want to do things outside the Neocities code editor and get one outside the site. I recommend Brackets, because my old as fuck computer can run that and absolutely nothing else apparently, and it works wonderfully! Though I recommend either turning off the code autocomplete or using it after a good while of already using the Neocities code editor, so you get used to coding on your own.
http://www.unit-conversion.info/texttools/text-to-html/
Turn your text into HTML code! i use this kind of pages for my lengthy blog entries that I don't feel like formatting myself.
https://imagecompressor.com/
COMPRESS YOUR IMAGES.
The heavier an image is, the more your site weighs and the more time your page will spend loading. You don't want that, specially if your site is heavy on graphics. This might help!
https://solaria.neocities.org/guides
Some CSS, JavaScript and Accessibility guides! Worth checking out!
https://eloquentjavascript.net/
This is a free, interactive book for learning JavaScript! NOTE: It is very intuitive, but JavaScript is HARD!! I still haven't learned much of it, and my website does fine without so don't worry if you end up not doing much with it. It's still useful + the exercises are fun.
And now, accessories!
• Silly stuff for your page :]
https://gifypet.neocities.org/
Make a virtual pet, copy the code and paste it in your HTML file! You'll get a little guy in your webbed site :]
https://www.wikplayer.com/
Music player for your website!
http://www.mf2fm.com/rv/
JavaScript silly effects for your site :]
https://blinkies.neocities.org/geoblinkies
Blinkie search engine!
https://www.cbox.ws/
Add a chatbox to your site!!
https://momg.neocities.org/
Infinite gallery of gifs. i've spent hours in there looking at moving pictures and out of them all, the ONLY gif i actually ended up using on my site was a rotating tomato slice. it is still there. trapped.
https://wrender.neocities.org/tarotinstructions
A widget that gives you a random tarot card!
https://www.websudoku.com/widget.php
Sudoku widget!
That's about it for now! I don't know how to end this!!! Remember to have fun and google everything you don't know :]
624 notes
·
View notes
Note
OH MY GOSH... I never knew UI database was a thing!! I'm so incredibly grateful you responded to my ask with that link, it's a game changer for sure. I've been referencing some of my favorite games when thinking through UI for my own game (Cyberpunk 2077, my beloved) but I never knew there was a site like that for more cohesive referencing. Thank you!!!!
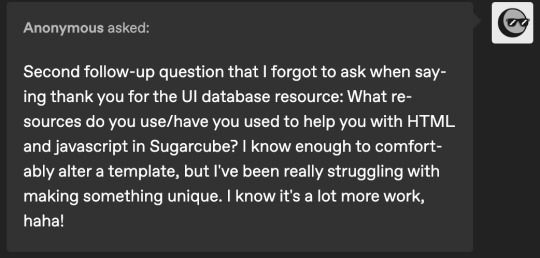
hi!! i am so incredibly sorry i am late answering these. life! you know how it goes.
i recommend w3schools for html, css and javascript! they have a lot of beginner tutorials for things you might be interested in, as well good explanations alongside examples.
i also watched a lot of dan cox's tutorials on youtube. he has a bunch of stuff on his page for sugarcube 2. as far as i know he has a few video for the new 2.37 version, where as i'm using 2.36 but that's up to you! super SUPER helpful to watching someone actively using the programme and talk through it.
idrellegames' coding in twine tag is also super helpful! i was scrolling through it all the time when i got started with twine lol
my best advice for coming up with a design that is unique is to not go straight into the coding first! i mocked up all of chop shops designs in photoshop before i started building it in twine. here are some old mock ups. it doesn't have to be photoshop, that's just the tool i have on hand, but something like canva would definitely work just as well! or, if you don't have access to anything digital, just using a pen and paper would work just as well. it's much easier to draw out a design than start coding it when you're not sure how it's even supposed to look yet.
i hope that helps a little! <3
40 notes
·
View notes
Note
hi i'm so sorry but if you feel like it could you help explain how to create a codex page in twine... i've just started figuring out twine and i'm extremely lost
There may be easier ways to do this, so mind you that I can only explain to you how I did it way back when I first made AToC. I'll start from the beginning, since I'm not sure how much you have or haven't figured out yet. I'm also not especially adept with coding, I just know enough basics to help me along!
Mind you these are instructions for Sugarcube, I don't know anything about Harlowe. You will need to know how <<if>> macros, variables and links work in order to understand this explanation.
First, if you want your codex links to show up in your sidebar, you need to create a passage called StoryMenu, which is where you can drop the links to your codex passages.
Further, if you only want the links to show up after the player has reached a certain point in the story, the easiest way I figured out how to do it is to create a variable.
Let's say, you only want your Character Codex to unlock after a player has reached a certain passage in the main story, then you should create a variable for it (e.g. $charcodex). At the passage where you want the codex to unlock, simply set $charcodex to true, and in your StoryMenu passage, qualify the link to the Character Codex with a simple <<if>> macro.
This is an example of what the StoryMenu of a very early build of AToC looked like:

Very basic! For AToC's current build, it looks a lot more complicated as I'm using a template with additional CSS code for formatting. I'm sure there's other ways to do it as well, but I'm not particularly adept with code so this is what worked easiest for me.
So, you've created your Character Codex, and it shows up in your StoryMenu, what now? Simple: just link to individual passages in your Character Codex however you want to format it. Like so:

There's a whole host of ways to format individual codex pages depending on your needs, like images or basic CSS code, but I won't get into that right now, you should be able to find tutorials for that!
Another important note: make sure to include the following code to your Javacript section, under the "Story" tab of the menu in Twine. It prevents players from getting caught in a loop of passages while they're going through the codex pages and the main story:
// MAKING SURE RETURN TO GAME LINKS DON'T CREATE A LOOP $(document).on(":passagestart", function() { if (!tags().includes("noreturn")) { /* If it doesn't, then set $return to the current passage name. */ State.variables.return = passage(); } });
This code requires you to tag any codex passages, both menus and individual ones, with "noreturn", like this:

Hope that explanation helped you!!
But, as I said, I'm not particularly skilled with coding. For future reference, if you need more coding resources, I would recommend checking out @/nyehilismwriting, @/idrellegames, and @/manonamora-if who have all set up extensive masterlists for coding resources or have answered questions from others that may be useful to you!
68 notes
·
View notes
Text

Text Typing Effect
#text typing effect#css text animation#pure css animation#html5 css3#html css#codenewbies#css animation examples#css animation tutorial#css#frontenddevelopment
6 notes
·
View notes
Text

Animated Card Design
#css animated card#css animation tutorial#html css animation#html css#frontend#css#html#css animation examples#css3#webdesign#animated card design#neduzone
5 notes
·
View notes
Text

CSS Loader Animation
#css loader animation#css loading animation#html css animation#html css#css#frontenddevelopment#webdesign#html#css3#learn to code#divinectorweb#css animation examples#css animation tutorial
5 notes
·
View notes
Text
Convert HTML to Image: A Step-by-Step Guide ✨

Do you want to turn some HTML code you've made that's on your website and have a way to convert it into an image for you to save?
Well, look no further! I too wanted to do the same thing but funny enough, there weren't any straightforward tutorials out there that could show you how! After hours of searching, I finally discovered the solution~!
This is an old tutorial I made 🐼

💛 Set your environment
Before we dive into the conversion process, I'll assume you already have your HTML code ready. What you want to learn is how to turn it into an image file. You should have a good grasp of HTML and JavaScript. For this tutorial, we'll use the following HTML code example:

We won't include the CSS code, as it doesn't affect this tutorial. The JavaScript file (script.js) at the bottom of the body element is where we'll add the functionality for the conversion.
Your page should resemble the following:

As you can see, the "Click me" button will handle the conversion. We aim to convert everything within the div.info-div into an image.
💛 Using the html2canvas JavaScript Library
The html2canvas library allows you to take screenshots of webpages and target specific elements on a screen. Here are the steps to include the library in your project:
The steps to put the library in your project:
Visit the html2canvas website for more information.
Copy the CDN link from here

and include it in a script tag in your project's head tag in the HTML file:

That's it for including the library on the HTML side. Now, let's move on to the JavaScript code.
💛 JavaScript Functionality
Here's the JavaScript code to handle the conversion:

In this code, I want to turn the whole div.info-div into an image, I put it into a variable in const div = document.querySelector(".info-div");.
I also put the button into a variable in const button = document.querySelector("button");
I added a click event listener to the button so when the user clicks the button, it will follow the code inside of the event listener!
You can find similar code like this in the documentation of the html2canvas library:

What is happening here is:
We add the div (or what the element we want to take an image of) into the html2canvas([element]).then((canvas)
Added the image file type url to a variable = const imageDataURL = canvas.toDataURL("image/png"); - You can replace the png to other image file types such as jpg, jpeg etc
Created an anchor/link tag, added the href attribute to imageDataURL
The download attribute is where we will give the default name to the image file, I added "dog.png"
Perform the click() function to the anchor tag so it starts to download the image we created
And that's it!
💛 The End
And that's it! You've successfully learned how to turn your HTML into an image. It's a great way to save and share your web content in a unique format.

If you have any questions or need further clarification, please comfortable to ask. Enjoy converting your HTML into images! 💖🐼
#my resources#coding#codeblr#programming#progblr#studying#studyblr#programmer#html#html css#javascript#neocities#coding tips#html5 tutorial#html tutorial
155 notes
·
View notes
Text
Html Tutorial Rec Wednesday
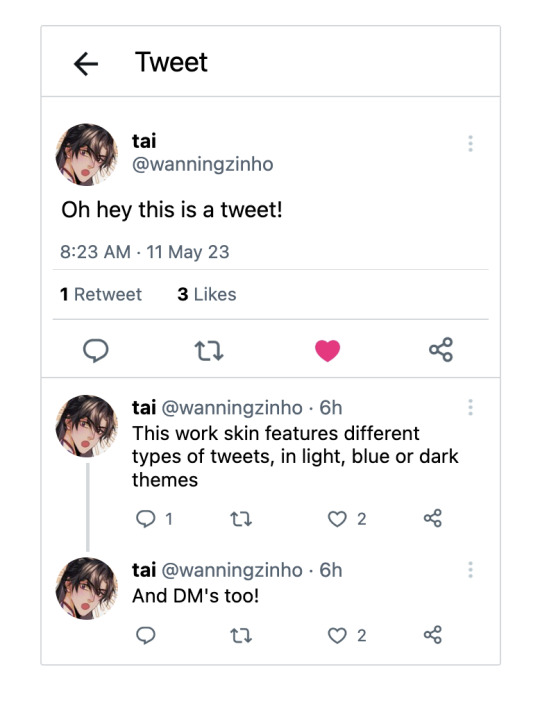
Twitter
Do the characters in your works use Twitter? Would you like them to?

Are they posting thirst tweets? Long threads compiling information against a specific celebrity or politician? Are they regular people whose tweets accidentally go viral, or are they celebrities that people pay close attention to?
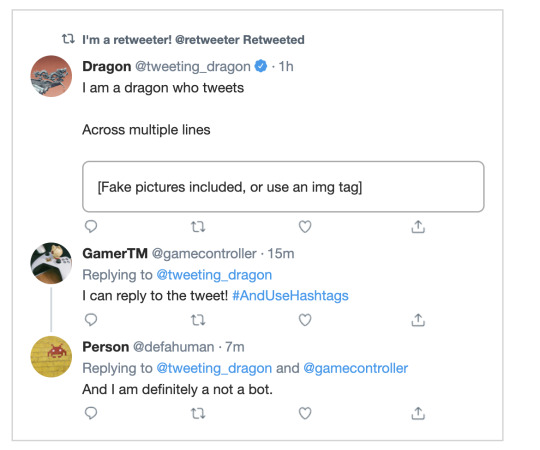
Either way, this tutorial by gadaursan makes it super easy to make tweets for your AO3 fanfictions! Gadaursan has also taken the time to make a code free html generator for any tweets you might want to embed into an AO3 fic!
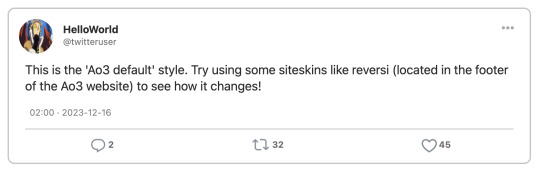
The tutorial lets you embed images, show polls, and use quote retweets, all while explaining the HTML and CSS structure behind it all. Dark mode tweets are also available, if you prefer that!
Multiple AO3 users have created their own versions of twitter work skins, each with a slightly different look and feel; check them out!
[Ao3 Skin] Twitter with threads by oakleaf
Mimicking Twitter Posts for Fics - Some Twitter Workskins by Ultraviollett
Twitter Work Skin: Tweets & Profile (newest layout) by starskin

Twitter Work Skin Template by etc e tal (pe_pe_peperoncinocandy)
and so on!
These examples are just to show you how there are many different ways to convey the same information / achieve the same result. Hopefully it inspires you to incorporate twitter into your own fics!
#html#html reference#reference#html tutorial rec#twitter#we're not calling it x#fanfiction#ao3#it's actually wednesday this time!! im doing so good
23 notes
·
View notes
Note
sorry if you’ve answered something similar before but how do you format things for your website? in the collections you have for poems
i love how it looks. the book kind of format it has
and i want to do similar/the same formatting for my own works but im really struggling…
i've been asked stuff like this a lot and i don't mind explaining it often because i want people to make websites more. i made a tutorial video at some point but it's kind of hard to make a curriculum or tutorial or whatever around this kind of thing because it's really just a self expression thing. i'll try to break down as much of my thought process as makes sense.
i design my pages in photoshop with either double/single page display in mind and then i use html to set them next to each other. most of the choice here comes down to how overwhelming i want my designs to feel. in the case of the lonely leaver page, the entire book was designed to be something that could be a physical book, and so from the getgo i made the pages in that kind of format. i previewed things in acrobat which has a booklet view mode (which singles out the front and back cover around the contents of the file) & allows you to process double page view as well. as for the actual process in photoshop before that point, i typically will open a canvas that is the size of the full 2 page spread (i.e. 8 inches wide for 2 pages which are both 4 inches wide) and i set grid lines for bleed margins and to mark the center of the page so that i can make the composition something that im comfortable with having a gap in the middle from the book folding. with lonely leaver i had to reformat about half the book at some point because i wanted to make it a larger resolution which was annoying but i just keep my guidelines for a print size in mind while im working. often if im a certain amount of time into a project that i feel like i will be spending a lot more time with i'll create a dummy psd file at this point which is devoid of content but which has all of the margins/resolution stuff set up already so i can just open that up and save a different version of it when i'm done.
my actual writing process and my design process is generally extremely intertwined, that's why things tend to be varying degrees stream of conscious in my work i think. i'll for instance, have a thought im stuck on for several days, and then open photoshop without having a poem or comic in mind, but i'll fill the canvas with some kind of color like red or yellow or a photo or whatever, and then open a text box or start drawing. telling a story through composition (i.e. page layout itself) is generally my favorite aspect of art and design because i enjoy how violent and dramatic framing angles can make the content of a piece feel so i'll try to move stuff around as much as possible in order to get my desired effect, often times using place holder shapes in lieu of finished design elements in order to get a rough blocking. as i do this i tend to react to what i'm writing/making as i'm doing it, and i do a lot of selective self editing during this part. for instance, i'll start manipulating rasterized text or cutting around images or whatever. i'll reread and look at whatever im doing for a couple of hours and then when i'm done with a spread or whatever i will save the document as a psd with a combined full spread and then each page separately as pngs or whatever (split at the middle grid line, back to the example, i'll save 2 different 4 inch wide images by changing the canvas size).
when it's time for me to put stuff on my website i then batch convert whatever pngs i exported into webp's because they load faster and take up less space on the server/my computer. you can look at my direct html/css files in your internet browser's explorer mode to see exactly what i do but essentially i just have either 1 or 2 images in a block and then a series of repeating vertical blocks containing images. i don't have an extremely efficient way of uploading pages and i'll typically just copy the same
"<p><img src="01.png"> <p><img src="02.png">"
like, 30 or 40 times or whatever into a html document. i use visual studio code for this stuff because it lets me do a bunch of stuff like having several files open at once & the navigation pane is nice & there's a live server extension that automatically refereshes the html file in my web browser on file save which is really awesome. i have a css page that i made like, 5 years ago, and i usually just link new projects to that because it has a bunch of different settings in it which i'll toggle on or off depending on the needs of whatever page or i'll add new div id's to it. it's kind of messy at this point, but it gets the job done. i use filezilla and something like bluehost or something for webhosting/file management.
i arrange and organize all of my art extremely methodically so usually in my like "<root catch all poetry folder>" inside of my "<root catch all art folder>" there will be a "<name of specific poem book>" folder which just contains the poems named by their actual name e.g. "dedication to saint eulalia 4.png" and then another folder inside of that is called "paginated" where i, using the acrobat document i arrange stuff in as reference, rename copies of my pages which i have placed in that folder to be named things like "01.png" so that i can then manually flip through it sequentially in the windows photo viewer and also just so that i don't have to go through the arduous process of renaming and tracking stuff inside of the root folder i'm containing that project's files in.
i'm 26 now and i made my first website when i was like 18, and my first zine project and i'm tired of feeling feeling around that same time, so i've got like, coming up on a decade of trial and error behind this and this is generally what has worked for me. my website isn't super complicated and mostly just gets the job done but because i try to think about style and presentation up front with whatever projects i'm doing i tend to just make plans based around that as early as it makes sense. to me having a website for art presentation has always been the Primary Method and intended landing zone for my art so it's genuinely always been a consideration in my process to try to plan around how i will put it on my website. i do this because i believe having my own curated space for containing my art allows it to exist in a context which best heightens whatever message i'm trying to convey. if there's an issues with my website right now they are that i'm very bad at mobile browser formatting & i havent updated the main look of the website in something like 4 years barely at all.
anyway, at the end of the day i think really as long as you can identify whatever your intentions are and do some planning/problem solving around that you should probably be able to find your own method which works for you better than mine might but if you do just want to copy my website the tools to do so are within your brain and internet searches and i believe in you. i think the biggest strength of my website is that it shows how easy it is to just put art big as fuck on a webpage and how effective that kind of minimalism can be. i just want my website to be like a museum's walls. and it's not super complicated to get to that level of html knowledge.
11 notes
·
View notes